
Check Temperature and Humidity with DHT22 Sensor and Arduino
19 Nov 2016This tutorial shows a way to read humidity and temperature from the environment with an Arduino and displays them on a LCD screen.
For this project we are going to use the following components: - Arduino board - 20x4 Character LCD (link) - DHT22 temperature/humidity sensor (link) - 10K resistor - Breadboard
The DHT22 is a low-cost digital sensor. It uses a capacitive sensor and a thermistor to measure the surrounding air. It is well calibrated and can measure humidity (0-100% RH) with +-2% and temperature(-40°C-80°C) with +-0.5°C accuracy.

DHT22 sensor has 4 pins:
- Pin1: VCC
- Pin2: Data Out
- Pin3: Not Connected
- Pin4: GND
We use a 20x4 LCD screen to display the results. Below are the pinouts from the LCD and the corresponding pin connection on the Arduino:
| Pin number | TextLCD pins | arduino pins |
|---|---|---|
| 1 | GND | 0V |
| 2 | VCC | 5V |
| 3 | VO | 0V |
| 4 | RS | pin12 |
| 5 | RW | 0V |
| 6 | E | pin11 |
| 7 | D0 | not connected |
| 8 | D1 | not connected |
| 9 | D2 | not connected |
| 10 | D3 | not connected |
| 11 | D4 | pin7 |
| 12 | D5 | pin6 |
| 13 | D6 | pin5 |
| 14 | D7 | pin4 |
| 15 | LED+ | 5V |
| 16 | LED- | 0V |
Notes: - Pin 3 gives contrast to the LCD screen and it is normally connected to a potentiometer. If you don’t need to adjust the contrast then you can just connect this pin to ground.
- Pin 5 is the read/write pin and can be in 2 modes. If it is in the write mode(LOW) then we can write(display) text to the LCD. When it is in the read mode(HIGH) we can read what the LCD is displaying. Since the latter is a rare situation, to make things simple we will have this pin permanently connected to the Ground pin of the arduino.
Check below the final circuit:
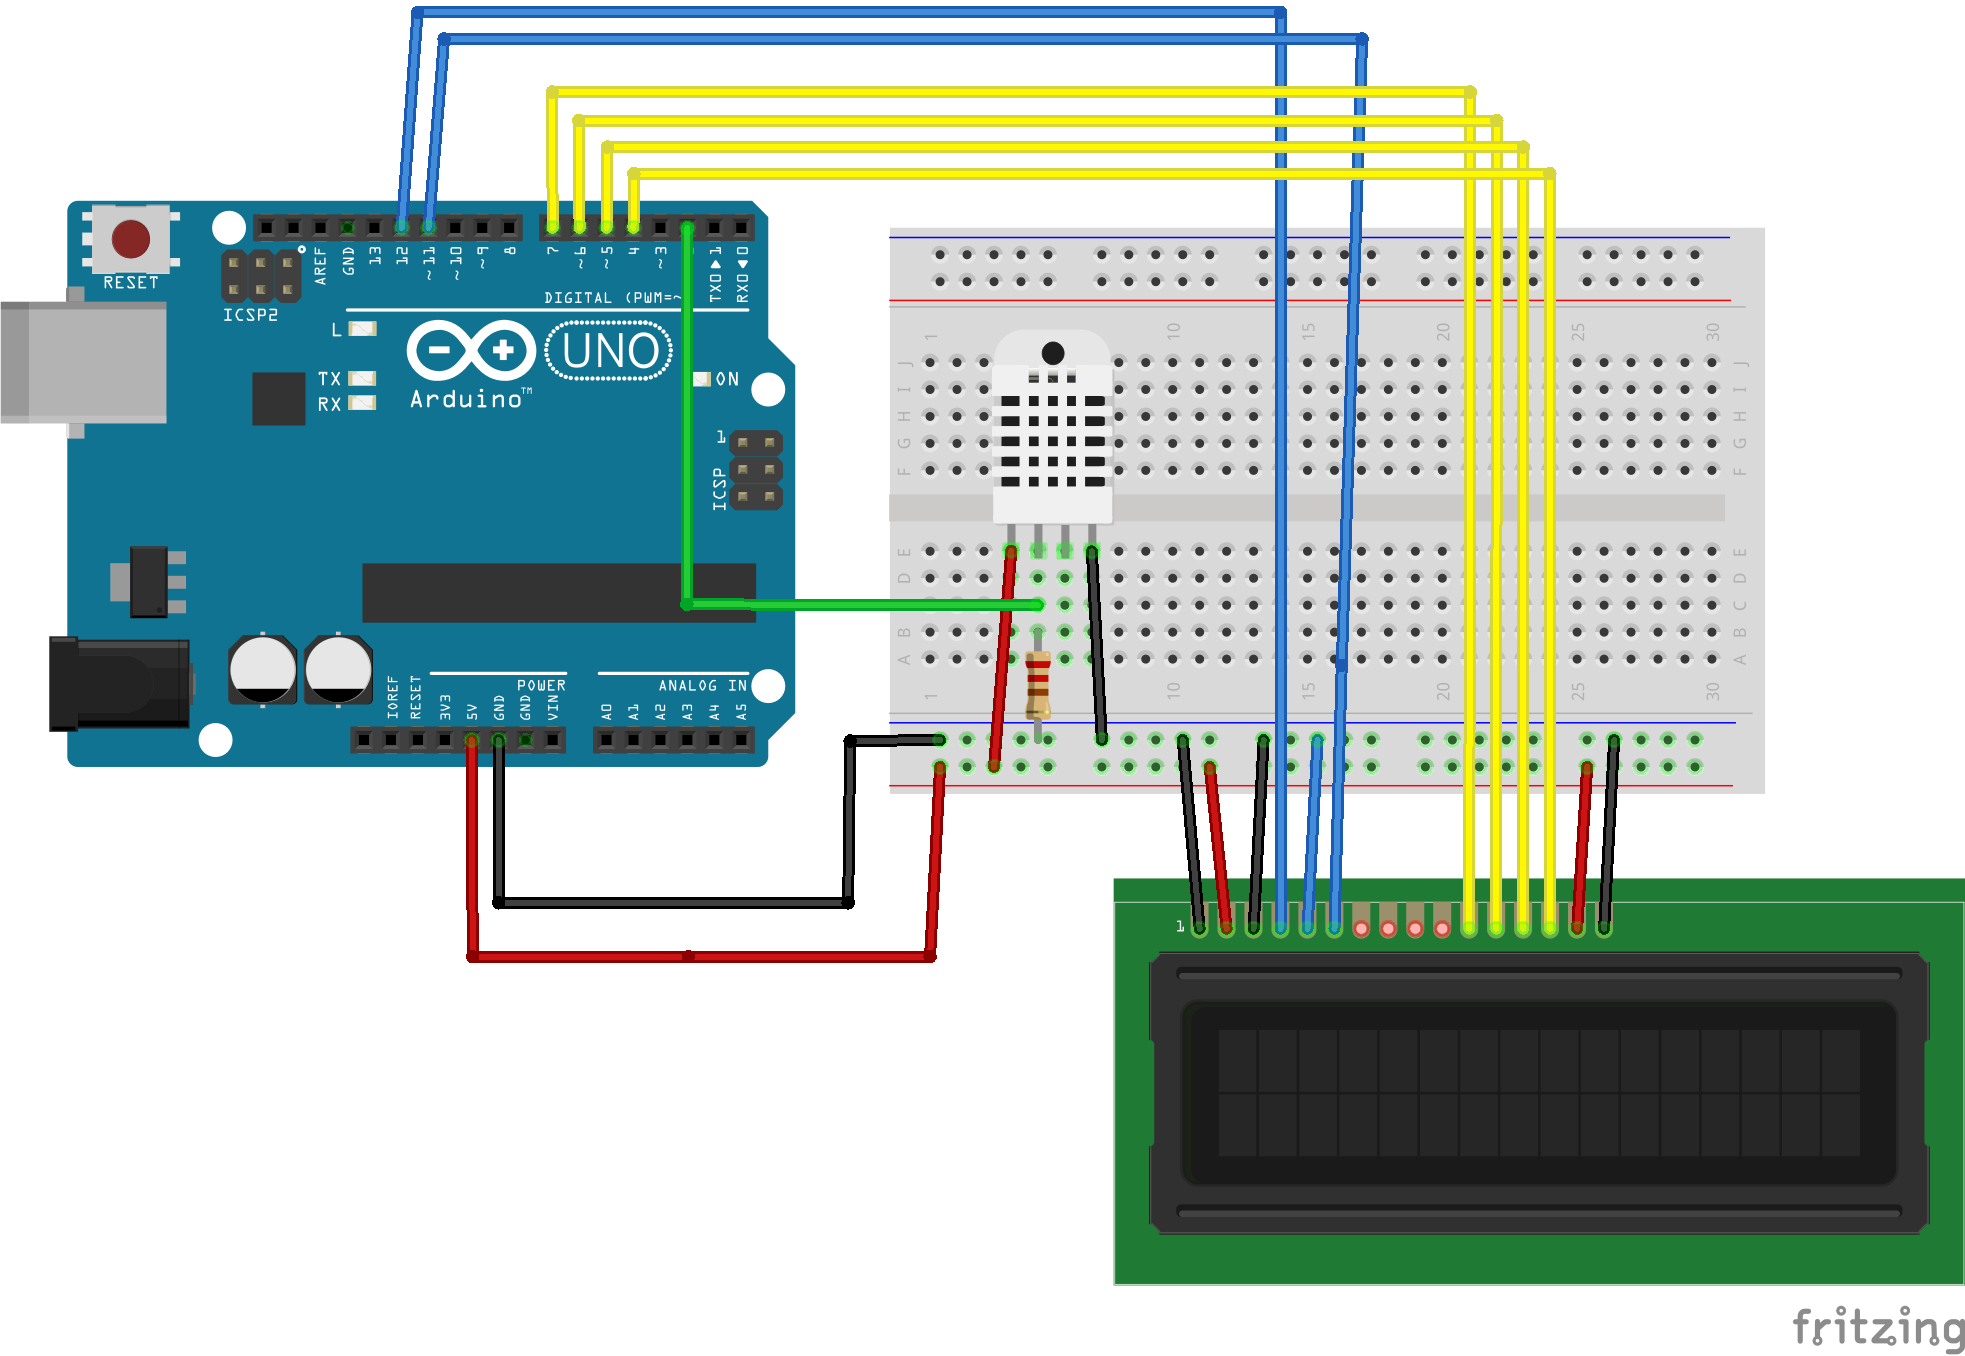
Notes: - Place a 10K resistor between VCC and the data pin to act as a pull-up resistor.
Code:
To use the DHT22 sensor you need to download and install the suitable library from adafruit’s github page. Download (or clone) the repository, rename the uncompressed folder to “DHT” and save it into the arduino “libraries” folder. For a more detailed tutorial on how to install arduino libraries check here. Addittionaly you need to install the Adafruit_Sensor library.
// include the library code:
#include <LiquidCrystal.h>
#include <DHT.h>

#define DHTPIN 2 //the digital pin where DHT22 sensor is connected
#define DHTTYPE DHT22

// initialize the library with the numbers of the interface pins
LiquidCrystal lcd(12, 11, 7, 6, 5, 4);
DHT dht(DHTPIN,DHTTYPE);

void setup() {
  // set up the LCD's number of columns and rows:
  lcd.begin(20, 4);
  // Print a message to the LCD.
  lcd.print("DHT22 test");
  dht.begin();
}

void loop() {
  delay(2000); //Wait a few seconds between measurements
  float h = dht.readHumidity();
  float t = dht.readTemperature();

  if (isnan(h) || isnan(t)){
  lcd.print("Failed to read from DHT sensor");
  return;
  }
  //Compute the heat index in Celsius
  float hic = dht.computeHeatIndex(t, h, false);

  lcd.clear();
  lcd.print("Humidity: ");
  lcd.print(h);
  lcd.print ("%");
  lcd.setCursor(0,1);
  lcd.print("Temp: ");
  lcd.print (t);
  lcd.print("*C ");
  lcd.setCursor(0,2);
  lcd.print("Heat Index: ");
  lcd.print(hic);
  lcd.print("*C");
}
Notes - The “heat index” is what the temperature feels like to the human body when relative humidity is combined with the air temperature. More information here.
Check Temperature and Humidity with DHT22 and Arduino from Ioannis on Vimeo.